A well-maintained motorcycle is safer and holds value, but what basic tasks can you carry out as a home mechanic?
Many motorcycle maintenance tasks are within the skills of a home mechanic, such as pre-ride checks and essential servicing. It depends on your skills and confidence, but I’ll describe some tasks that most people can carry out.
1. Pre-riding checks
Carrying out pre-riding checks has several advantages.
First, your ride will be safer, and you will more likely make your destination without incident.
Second, regularly checking your motorcycle is preventative maintenance.
Third, you will learn about your motorcycle and understand it better.
Using the POWDERS acronym, it’s easy to check quickly before heading off down the road. I’ll cover the checks briefly and describe what to look for in detail later.
- P is for Petrol: Do you have enough fuel to get where you are going, or do you need to top up?
- O is for Oil: Using the sight glass or dipstick, check your bike’s oil level. Follow the owner’s manual guidance. This also gives you the chance to check the color of the oil.
- W is for Water: Talking of water, this is the next check! You can skip this on air-cooled bikes, but it’s crucial on liquid-cooled bikes.
- D is for Damage and Drive Chain: While your bike is unlikely to suffer damage if parked in a garage, motorcycles parked on the street are more vulnerable. Checking your drive chain regularly will reduce the wear and avoid being stranded at the side of the road with a snapped chain or potentially worse.
- E is for Electrics: A quick check of your lights, indicators, brake lights, etc.
- R is for Rubber: As the only thing keeping you upright, the condition of your tires is worth a good check before setting off. Check the pressures and look for any damage.
- S is for Stopping and Self: Stopping concerns your brakes, and you can quickly check the pad wear and brake fluid level. The Self part refers to how you feel. Riding while ill, angry, tired, or not feeling 100% increases the risk of riding. Be honest, and stay at home if you don’t feel right.
Regular Maintenance Checks
If you follow the POWDERS method described above, you will discover a problem before it develops into something worse and probably more expensive.
Let’s now turn to regular maintenance tasks that most home mechanics can confidently cover.
1. Oil and filter change
Changing the engine oil is a simple task that requires only a few basic tools in most cases. Warm the engine first, so the oil flows a little easier. If you have one, put the bike on its center stand or use a dedicated motorcycle stand.
Gain access to the sump, remove fairing parts as required, and put a suitable container below the sump plug. Remove the oil filler plug and the sump plug, collecting the oil in the container. Also, remove the oil filter and place a container below it. Allow the oil to drain for a while if you have the time.
Once you’ve got out as much oil as possible, refit the sump plug with a new washer, fit a new oil filter and refill with fresh oil. Follow the manufacturer’s recommendations for the amount and type of oil. Overfilling the oil can be disastrous for engine oil seals, so be careful to add the correct amount.
Now run the engine, checking for leaks. Once you are happy, ensure the oil level is correct, and refit any removed parts.
Between changes, the oil will turn black. However, if the oil has a milky color, it indicates water is getting into the oil and needs investigating.
Also read:
2. Air filter clean or change

Changing or cleaning the air filter is another regular job that is usually very easy. On older bikes, the filter(s) may be on the back of the carburetors, but the filter is in an airbox for most modern bikes.
Some filters can be cleaned, such as foam K&N type, but paper filters usually need to be changed. On most newer bikes, the airbox is under the gas tank, so you’ll need to lift or remove it, which is usually the only tricky step.
Once you have access to the airbox, removing the securing screws or clips to replace the filter should be easy. Ensure that any rubber seal goes back on correctly; otherwise, air leaks could affect your bike’s performance.
3. Coolant change
Coolant in your motorcycle engine serves two crucial functions. First, it keeps your motorcycle cool, but second, the chemicals in the coolant protect the engine internals from corrosion.
Check the level when the engine is cold. There is usually an expansion tank with high and low marks, and you top up the water via the expansion tank. Don’t open the filler when the engine is hot, as the system is under high pressure, and you can easily burn yourself.
You will need to consult the manual to determine where your particular drain point is, but it usually is easy to find. The manual may also specify a specific method for refilling to avoid airlocks in the system.
Don’t make the mistake of using car coolant in a motorcycle engine.
4. Brakes

So far, we have talked about maintenance to protect your motorcycle, but now we’ll look at some items that also affect your safety.
Maintaining good brakes on your motorcycle is a no-brainer. If your motorcycle brakes fail, it will probably be painful, so pay particular attention to them.
There are two separate parts to look at;
Brake pads and shoes
Very few modern motorcycles have drum brakes, for a good reason, but make sure before you start. For this reason, we will concentrate on disc brakes, which are now the standard fit.
You can check your disc brake pads by looking at the central groove that runs through them. Once the groove has almost disappeared, it’s time to change the pads.
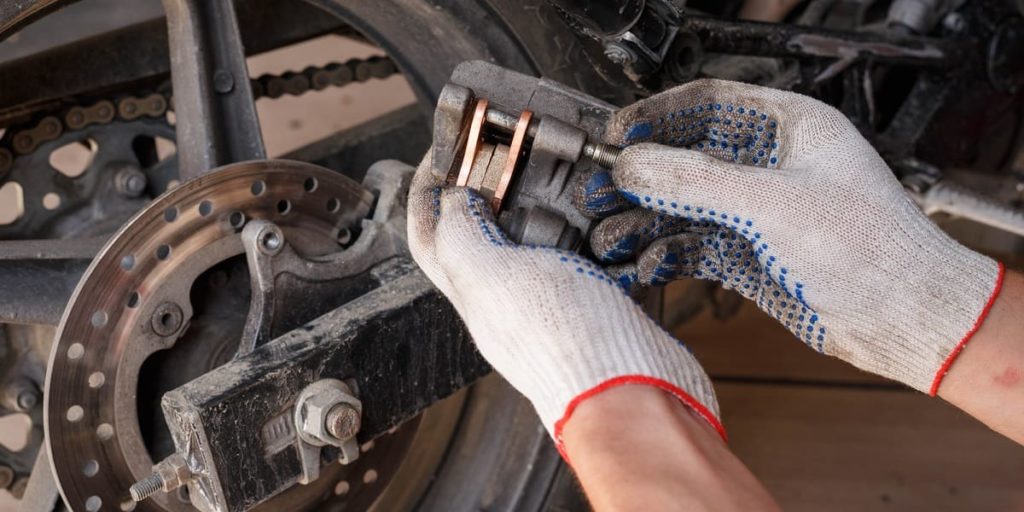
Your brake pads are usually held in place by sliding pins and/or springs. Each bike is slightly different, so refer to the workshop manual. The pads are generally easy to replace, but sometimes pushing back the caliper piston can be difficult.
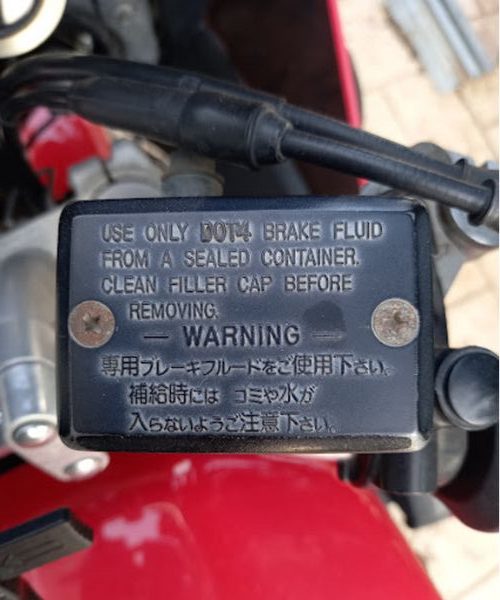
Remember to remove the brake fluid reservoir cap and put some rags around it to prevent brake fluid from getting onto your paintwork. Brake fluid is very corrosive and can easily damage your paint.
5. Hydraulic fluid system
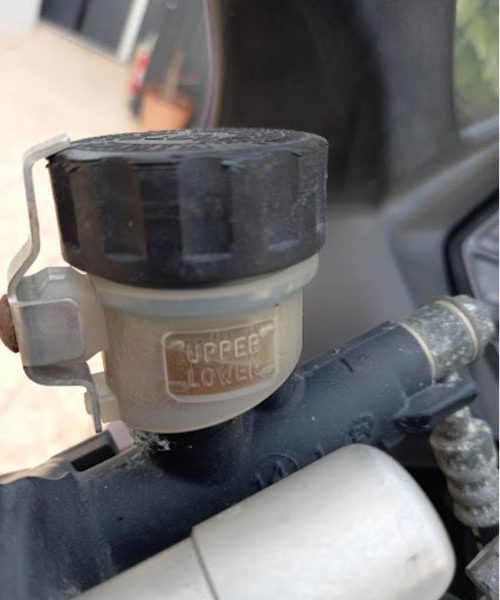
A hydraulic fluid system operates your motorcycle brakes, and keeping it in tip-top condition is essential.
Change the fluid at least as often as the service manual tells you. Hydraulic fluid is hygroscopic and absorbs moisture, reducing your brakes’ effectiveness. Changing the brake fluid is easy but requires some tools;
- A spanner to open and close the brake caliper bleed nipple
- A plastic tube that fits the bleed nipple
- New hydraulic fluid
- A container to catch the old hydraulic fluid
- Possibly a screwdriver to remove the reservoir cap
6. Drive chain or shaft-drive
Drive chain
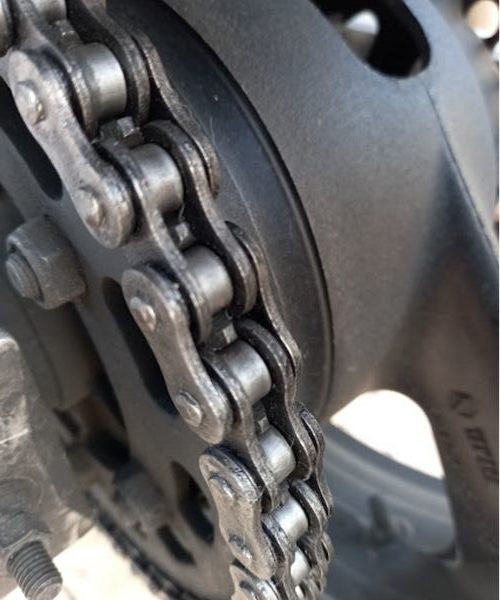
A correctly adjusted and maintained drive chain will massively increase its working life. Your chain and sprockets have a tough life, particularly in countries with a lot of rain. Dirt and oil combine on the chain to form a grinding paste that quickly wears out both chain and sprockets.
Changing a chain will often require a chain breaker or swingarm removal. You can use split links on chains, but trusting that on something with a lot of power is not advised.
First, clean your chain with a rubber-safe solvent and brush to prevent damage to the o-rings, then lightly oil the chain. Do this regularly, and your chain will last longer. While cleaning the chain, check for any tight links, spots, or damaged o-rings. Also, check the sprocket teeth.
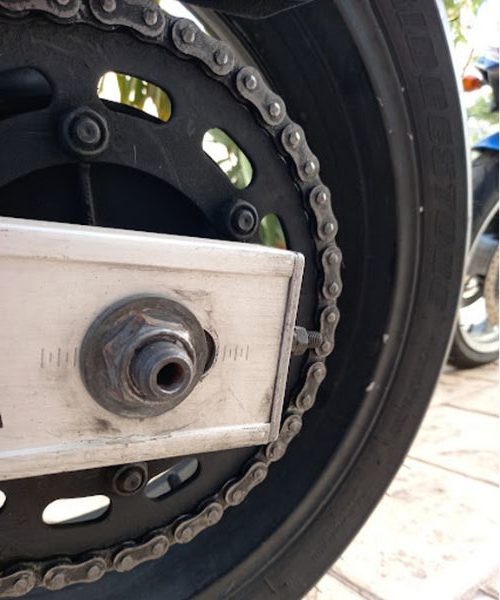
Next, adjust your chain correctly. Don’t rely on the adjustment marks on your swingarm, as they are generally not very accurate. Tools are available to help you set up the correct rear wheel alignment and the correct tension.
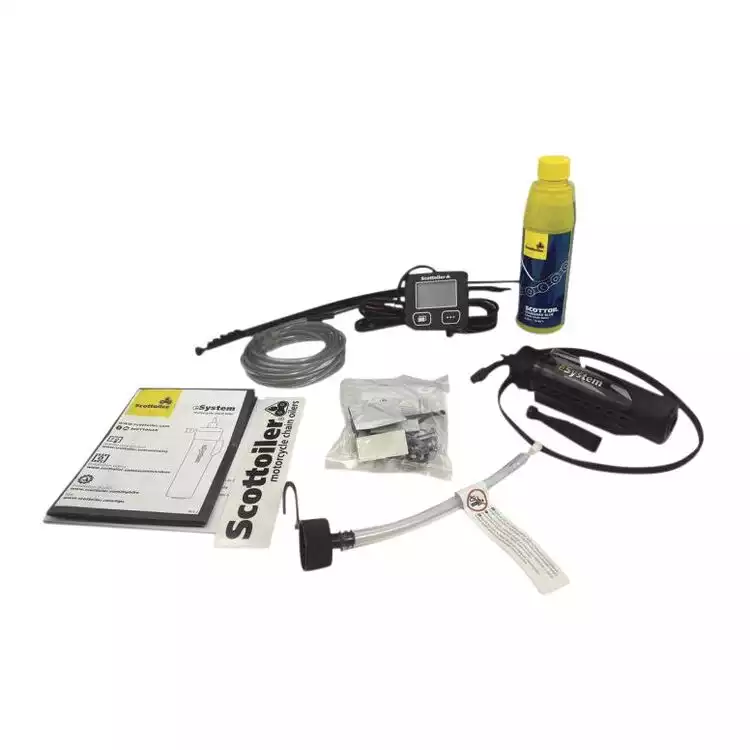
Consider fitting a chain oiler, such as a Scottoiler. These drip a small amount of oil onto your chain while the engine is running. I’ve used them in the past and had excellent results.
Shaft drive
Home mechanic maintenance on a shaft drive bike is restricted to changing the oil and inspecting for damage. You can drain the oil by removing the drain plug and then refilling it with the correct amount of recommended oil.
Inspecting the drive shaft would require suitable tools and expertise beyond most home mechanics. However, you can put the bike on the center stand and slowly turn the wheel, listening for any noise or roughness. If you suspect anything, then ask your dealer to check it.
7. Tires and wheels

Tires are generally the most frequently replaced component of your motorcycle, but you must check them regularly. Your tires are the only contact between you and the road. (Read how much should a tire change cost?)
The tire pressures should be checked and adjusted as part of the POWDERS checks before each ride. At the same time, it’s a good idea to look for any damage to the tread or sidewall and make sure nothing is embedded in the tire.
If you find any tire damage, I recommend removing the wheel and taking it to a garage to be checked and replaced if necessary. If you have to ride the bike, take it slowly.
Wheel damage is usually a rim dent if you hit something solid like a curb or possibly tiny cracks. In both cases, get them checked and fixed. Spoked wheels have their own issues. The spokes can come loose or corrode, so check them carefully.
8. Battery
Apart from keeping the battery charged correctly, the only other thing you can do is clean the battery terminals and the cable ends. Once cleaned, give them a light covering of petroleum jelly.
If you intend to store the motorbike in the winter, it’s a good idea to remove the battery and store it, using a trickle charger to keep it in perfect condition.
9. Lights
Checking your lights and replacing anything that has blown usually is pretty straightforward. Make sure you check the brake light operating switches.
Over time, the switches can corrode and stop working. Your chances of being rear-ended by a less observant driver are increased if your brake lights are not working.
10. Cables/Controls
Cable controls are becoming less common on modern bikes, as throttles are now electronic, and clutches often use hydraulics. However, if you have cables, they will need regular oiling to prevent them from seizing. Cable oiling tools are available to make the job easy, or take the bike to your local mechanic.
Don’t be tempted just to spray WD40 down the cables. This may work briefly, but some cable liners react badly to the silicone in WD40, and eventually, the line will lock solid and need replacing. I’m speaking from experience here!
11. Grease moving parts
You can easily grease brake and clutch levers, plus gear change linkages. Some bikes will have grease nipples on the swingarm bearings. Wheel bearings are simple to grease; just remove the wheels from the bike.
Most bikes have cut-out switches on the sidestand and clutch lever. Clean these with contact cleaner and put a little grease over them.
Don’t forget to put a light smear of grease on the front and rear wheel spindles if the manufacturer recommends it. Doing this makes wheel removal much easier.
12. Clean your bike regularly
Not mechanical maintenance, but vital all the same. Washing and cleaning preserves the bike’s value and gives you a chance to spot any potential problems. Although not exactly scientific, a clean bike also seems to ride better. It’s probably just in my imagination, though!
Read about how to wash a motorcycle properly.
And finally
As you can see, there is a surprising amount a home mechanic can do, and it is definitely worthwhile. Maintaining your bike makes it safer and will hold its value if you decide to sell. There’s also something satisfying about working on your bike.
Lastly, if you do have the misfortune to break down, you might just have the knowledge to fix the problem and get home.