Many motorcycle ignition switches contain a small resistor, usually 100 ohms. The purpose of the resistor is to prevent hot-wiring.
If your bike won’t start, but you can’t find the problem, the resistor may have failed. This article looks at the symptoms of a failed ignition resistor and how to cure the problem.

Why is there a resistor in your ignition switch?
It’s a straightforward and cheap anti-theft device. The purpose of the resistor is to prevent a thief from hot-wiring your bike.
You might wonder how a 100-ohm resistor can prevent your bike from starting. The resistor is in series between the ignition switch and the CDI (Capacitive Discharge Ignition).
With an inline resistor, a lower voltage of around 9V is applied to the CDI. Your bike’s ECU can sense the lower voltage and allows power to your spark plugs. So if a thief tries to hot-wire your bike, the full 12 volts is applied, and the ECU prevents the spark plugs from firing.
Do all Kawasakis have the ignition resistor?
No, Kawasaki does not fit the ignition resistor to all models. It will depend on the model of your bike and even which country you bought the bike.
Unfortunately, you will not be able to check this in the bike manual, as it will not be mentioned. As a security device, manufacturers don’t highlight if the resistor is fitted or not.
Why bypass the ignition switch resistor?
Resistors are generally very reliable a rarely fail. However, if the ignition switch resistor fails, you won’t be able to start your bike. Everything will seem normal; all the lights and instruments will work, but the bike will turn over and not start.
How to bypass the ignition switch resistor
Bypassing the resistor is a relatively easy DIY job if you have a little electrical knowledge and suitable tools. However, if unsure, I recommend taking your bike to a mechanic.
Parts and tools you will need
- 100 ohm, 1/2 watt resistor
- Soldering iron
- Solder
- Wire of the same gauge as your current switch wire
- Heat shrink
- Heat gun – although you may get away with a hairdryer
Resistor bypass process
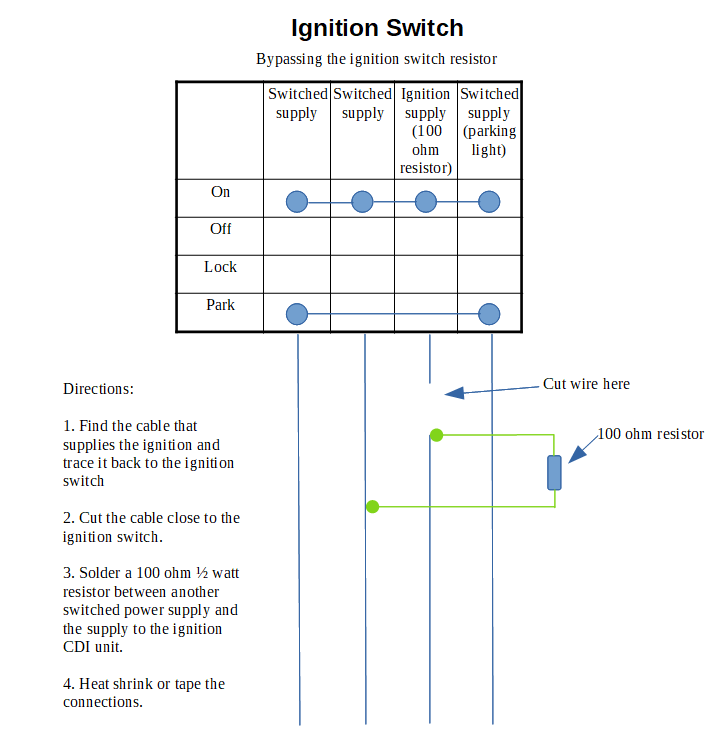
The original resistor is located on the bottom of the ignition switch, so the first job is to remove the ignition switch. Check your bike’s manual if you are unsure how to remove it.
Because we will need to cut a wire and insert the resistor, we need to do this on the ignition switch wiring side rather than on the main loom. Breaking into the main wiring loom is not a great idea!
If you have the skills, you could try to replace the original resistor, but the easier option is to bypass it.
Steps to bypass the ignition resistor
- Identify which wire attaches to the resistor. On most Kawasakis, it is a grey wire, but do check!
- Disconnect or cut the cable to remove it from the ignition switch.
- The ignition switch will have several switched power cables. Identify one that you can use to connect to the resistor. It must be a switched power supply, so it only has voltage when you turn the ignition key.
- You connect the resistor between the switched power supply and the cable you removed from the ignition switch in step 2.
- Solder the connections together and put heat shrink over them for protection.
Function check
Before putting everything back together, do a quick function check to make sure your bike starts.
And finally
It’s a little-known fact that the 100-ohm resistor is fitted to many Kawasaki ignition switches. If you are having starting problems with your bike and have tried all the usual fixes, this might be the cause. Hopefully, this article will save you a lot of frustration in the future if you ever encounter this fault.