Out of sight, out of mind is a common phrase you could easily apply to your motorcycle air filter. Despite the air filter’s importance in your motorcycle’s fuel system, it’s usually hidden away on modern motorcycles and quickly forgotten.
But you definitely don’t want to forget about it.
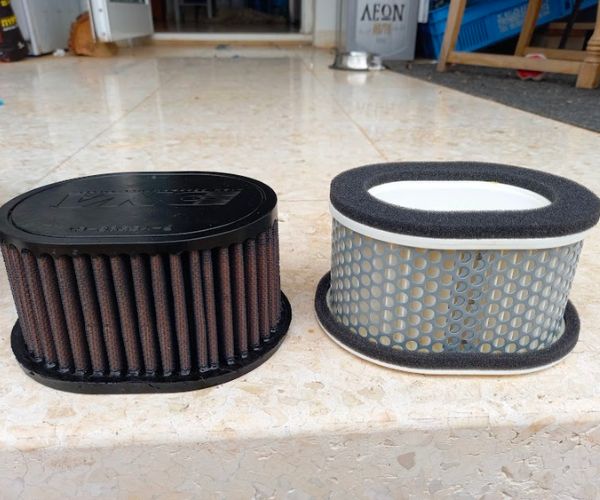
Motorcycles come with one of three types of air filter: paper, cotton, or foam. Paper filters need to be changed out regularly, whereas cotton and foam filters can be cleaned and reused.
In this short article, we’ll describe how to check, clean, and change your filter if required.
Changing Your Motorcycle Air Filter: Step by Step
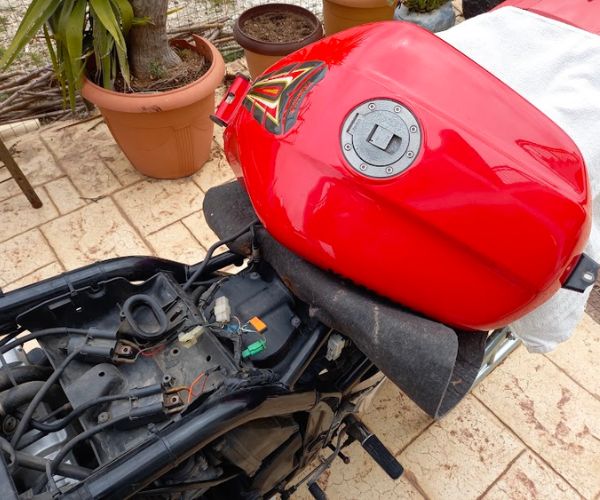
Changing your motorcycle air filter varies hugely from bike to bike. Sports and sports touring bikes mostly have filters housed under the fuel tank.
Customs and cruisers, like Harley-Davidsons, often mount the air filter on the side of the engine.
The first place to start if you need clarification is the service manual for your bike.
In my example, I’m changing the air filter on a 1998 FZ400 Fazer. The filter is under the tank, which usually means disconnecting the fuel lines. On the Fazer, the tank is held in place by a single bolt on the headstock and a bolt across the base of the tank.
Luckily, a previous owner of this bike had extended the fuel lines so that all I had to do was move the tank to one side.
With the tank out of the way, I had to remove the four crosshead screws in the top of the air box and remove the cover. With the cover removed, replacement is straightforward.
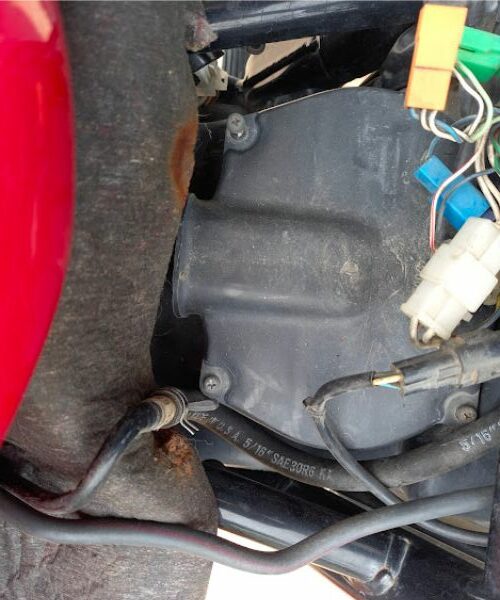
Reassembly is the reverse process, ensuring you fit the airbox cover properly. If not, too much air will get in and could upset the fuel-air mixture.
Step-by-Step Instructions
- Locate your air filter! This may sound obvious, but some are tucked away in awkward places and take a bit of work to get to. The owner’s manual should show you the filter’s location.
- Remove any bodywork panels required to access the air filter. This may include the fuel tank.
- Open the airbox. The cover is usually held on with either clips or screws.
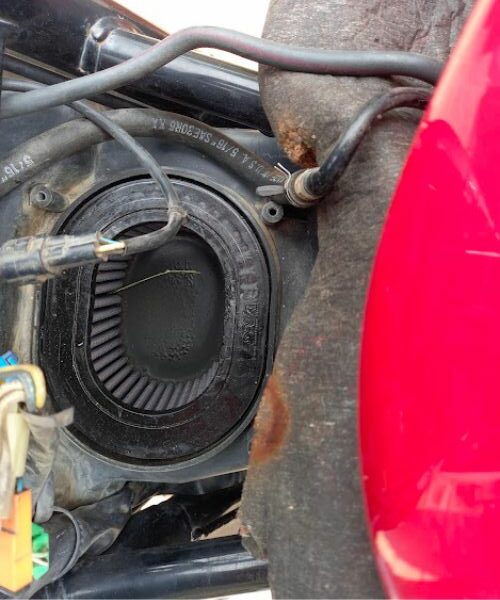
- Remove the air filter and inspect.
- What you do next depends on the type of filter.
- Paper filters are replaced every time.
- Foam filters can be washed, oiled, and refitted.
- Cotton filters can be cleaned, oiled, and refitted.
- Fit the new or cleaned filter in the airbox.
- Fit the airbox cover, making sure you get a tight, even fit for a good seal.
- Refit any panels you removed.
Types of Motorcycle Filters
Each type of motorcycle air filter has its pros and cons.
Paper Air Filter
Paper air filters are cheap and easy to manufacture. Hence, most motorcycle manufacturers use them on their bikes as original equipment. The filters are pleated to increase the surface area and airflow.
Paper filters quickly get clogged up in very dusty conditions, such as off-road motorcycling, but they are perfect for road bikes.
Pros:
- Cheap
- Available everywhere
Cons:
- They clog quickly
- Cannot be cleaned; only replaced
Foam Air Filter
Fitting a foam filter was a typical “upgrade” in the past, particularly on motorcycles with carburetors. The individual foam filters gave the bike a racing look, which was more important to some than the filter’s efficiency.
Foam filters are reusable; you can clean them, re-oil, and reuse. On the downside, the filtering capabilities of foam filters rely on oil. If you allow a foam filter to dry out, your engine will quickly suffer.
Pros:
- Reusable
- Don’t need replacing often
Cons:
- Require regular maintenance
- Clog easily
- Lower filtering capabilities compared to other types of filters
Buying the correct filter
Use Revzillas part picker to select the correct filter for your bike.
Cotton Air Filter
Cotton air filters have replaced foam as the upgrade of choice for motorcycles. Cotton filters have significant advantages over paper and foam filters, but these advantages come at a cost.
You can wash foam filters in soapy water, but you clean cotton filters with a chemical solution and then apply oil over the entire filter. You must get an even oil film over the whole surface of the filter for it to be effective. However, if you live in a dusty area, the protection your engine enjoys will be worth the effort.
Pros:
- Can be cleaned and reused
- Excellent filtering
Cons:
- Expensive compared to alternatives
Which Motorcycle Air Filter Should You Choose?
A good quality paper filter will be the best choice for most bikes. Paper filters are cheap, easy to find for most motorcycles, easy to change, and require no maintenance.
However, if you ride in dusty conditions, a paper filter quickly becomes clogged and needs replacing. A foam or cotton filter would be the better choice in these cases.
How to Clean Foam and Cotton Air Filters
Only foam and cotton filters can be cleaned. You must change paper filters.
Before starting, buy some filter oil to reapply to the clean filter. And always wear gloves when cleaning your filters.
Washing a Foam Air Filter
Cleaning a foam motorcycle air filter is a simple process.
- Remove the filter from the bike.
- Remove the foam part from its support.
- Soak the foam in a bucket of soapy water.
- Gently squeeze the foam to remove as much dirt and old oil as possible.
- Rinse in clean water.
- Gently squeeze out most of the water.
- Let the filter air dry.
- Reoil the filter following the manufacturer’s recommendations, making sure the filter is completely covered.
- Refit the filter.
Washing a Cotton Air Filter
Cotton filters need a little more care than their foam counterparts, but they are still easy to clean. Here’s how to do it:
- Remove the filter from the bike.
- Spray the filter, inside and out, with cotton filter cleaner.
- Allow the cleaner to soak in for around 10 minutes.
- Rinse the filter with low-pressure water, removing all the cleaning compound.
- Allow the filter to air dry.
- Apply filter oil according to the manufacturer’s instructions, giving a full and even coat of oil.
- Refit the filter.
Why Is Your Motorcycle Filter Important?
The tolerances inside your motorcycle engine are very tight.
What does that mean? The gaps between moving parts, for example, the piston rings and cylinder, are minimal. Engine oil keeps the piston rings and cylinders running smoothly, but a tiny piece of debris introduced into the engine could cause severe damage.
This is where the motorcycle air filter comes in.
Your motorcycle air filter performs a delicate balancing act between supplying the engine with sufficient air and preventing particles from getting in.
You might see race motorcycle engines with no filter, but these engines get rebuilt after every race and replaced often. Replacing your engine is expensive and impractical, so your air filter is essential.
How Often Should You Change Your Motorcycle Air Filter?
As a rough guide, around every 12,000 miles on a road bike is an excellent time to change your filter, but refer to the owner’s manual for the exact schedule. If you ride your bike in dusty conditions, you should check your filter often.
For example, dirt bike filters should be checked regularly, even after each ride, but a road bike filter will last much longer.